タグ: Solr

【Solr】インデックス作成時に言語判定してフィールドを振り分ける

はじめに

Solrでインデックスしたいドキュメントが日本語だけと限らない場合があります。日本語の場合なら形態素解析ベースのトークナイザーを使いたいが、英語の場合は空白区切りベースのトークナイザーを使いたい。そういうときに使える言語判定の仕組みをSolrは備えています。

言語判定とスキーマ定義の方針

以下のような簡単なドキュメントを考えます。

[
    {
        "id" : "1",
        "text" : "Solr 8.4 からパッケージ管理機能が追加されました。リファレンスによると、ここでいうパッケージは1つまたは複数のプラグインを1つにまとめたものという意味のようです。Solr におけるパッケージ管理について調べました。",
    },
    {
        "id" : "2",
        "text" : "Starting in Solr 8.4, package management features have been added. According to the reference, package here means one or several plug-ins in one package. We looked at package management in Solr.",
    }
]

“text”が本文のフィールドで、ここに日本語の文章が入るかもしれないし、英語の文章が入るかもしれないという設定です。

日本語の場合は形態素解析を行う text_ja というフィールドタイプ、英語の場合は空白区切りベースの text_en というフィールドタイプにします。以下のようなスキーマ定義のイメージです。

<field name="text_ja"      type="text_ja"    indexed="true" stored="true"/>
<field name="text_en"      type="text_en"    indexed="true" stored="true"/>

言語判定の設定

以下を solrconfig.xml に追加して必要なライブラリを読み込みます。

<lib dir="${solr.install.dir:../../../..}/dist/" regex="solr-langid-.*\.jar" />
<lib dir="${solr.install.dir:../../../..}/contrib/langid/lib/" regex=".*\.jar" />

LangDetectLanguageIdentifierUpdateProcessor を使う updateRequestProcessorChain を設定します。

 <updateRequestProcessorChain name="langdet">
    <processor class="org.apache.solr.update.processor.LangDetectLanguageIdentifierUpdateProcessorFactory" name="langdet">
      <lst name="defaults">
        <str name="langid.fl">text</str>
        <str name="langid.langField">language</str>
        <str name="langid.whitelist">ja,en</str>
	<str name="langid.map">true</str>
        <str name="langid.fallback">other</str>
      </lst>
    </processor>
    <processor class="solr.LogUpdateProcessorFactory" />
    <processor class="solr.RunUpdateProcessorFactory" />
  </updateRequestProcessorChain>

上で設定した langdet チェインを update リクエストのときに使うように設定します。

  <initParams path="/update/**">
    <lst name="defaults">
      <str name="update.chain">langdet</str>
    </lst>
  </initParams>

langid パラメータの意味

langid.fl

言語判定処理の対象とするフィールド名。上の設定では text フィールドを対象としています。

langid.langField

言語判定結果の文字列(jaとかenなど)を格納するフィールド。上の設定では language フィールドを対象としています。

langid.whitelist

言語判定の対象とする言語名。上の設定では日本語と英語を対象としています。

langid.map

言語判定結果をフィールドにマッピングするかどうか。マッピングする場合はtrueを指定します。デフォルトでは {元のフィールド名}_{言語名} というフィールドにマッピングされます。上の設定では日本語判定の場合は text_ja フィールドに、英語判定の場合は text_en フィールドにマッピングされます。

langid.fallback

langid.whitelist で指定した言語にあてはまらない場合のマッピング先を決定するための文字列。上の設定では other を指定しているので、日本語でも英語でもない場合は text_other フィールドにマッピングされます。

スキーマ定義

言語判定の設定に基づいてフィールドを定義します。

<field name="text_ja"      type="text_ja"    indexed="true" stored="true"/>
<field name="text_en"      type="text_en"    indexed="true" stored="true"/>
<field name="text_other"      type="text_ngram"    indexed="true" stored="true"/>
<field name="language"  type="string"  indexed="true" stored="true"/>

updateリクエストで送られてきた text フィールドの内容を言語判定して、日本語なら形態素解析して text_ja フィールドに、英語なら StandardTokenizer を通して text_en フィールド に、それ以外なら ngram 分割して text_other フィールドに格納されます。

動作確認

上記の設定でコレクションを作成してサンプルドキュメントを投入してみます。

$ cd server/solr/configsets
$ cp -r _default langdet
[langdet/conf/{solrconfig.xml,managed-scheme}を編集
$ (cd langdet/conf && zip -r - *) |curl --user user:pass -X POST --header "Content-Type:application/octet-stream" --data-binary @- "http://localhost:8983/solr/admin/configs?action=UPLOAD&name=langdet"
$ curl --user user:pass 'http://localhost:8983/solr/admin/collections?action=CREATE&name=langdet&numShards=1&replicationFactor=1&collection.configName=langdet&wt=json'
$ cat ~/sample.json 
[
    {
        "id" : "1",
        "text" : "Solr 8.4 からパッケージ管理機能が追加されました。リファレンスによると、ここでいうパッケージは1つまたは複数のプラグインを1つにまとめたものという意味のようです。Solr におけるパッケージ管理について調べました。",
    },
    {
        "id" : "2",
        "text" : "Starting in Solr 8.4, package management features have been added. According to the reference, package here means one or several plug-ins in one package. We looked at package management in Solr.",
    }
]
$ bin/post -u user:pass -c langdet ~/sample.json

最近のSolrでは、認証を設定しないとsolrconfig.xml内にlibディレクティブでライブラリを追加できないので注意が必要です。

$ curl -s -u user:pass "http://localhost:8983/solr/wikipedia_langdet/select?omitHeader=true&q=*%3A*"
{
  "response":{"numFound":2,"start":0,"numFoundExact":true,"docs":[
      {
        "id":"1",
        "language":"ja",
        "text_ja":"Solr 8.4 からパッケージ管理機能が追加されました。リファレンスによると、ここでいうパッケージは1つまたは複数のプラグインを1つにまとめたものという意味のようです。Solr におけるパッケージ管理について調べました。",
        "_version_":1682039285845327872},
      {
        "id":"2",
        "language":"en",
        "text_en":"Starting in Solr 8.4, package management features have been added. According to the reference, package here means one or several plug-ins in one package. We looked at package management in Solr.",
        "_version_":1682039286023585792}]
  }}

正しく言語判定されて、それぞれのフィールドに振り分けされました。


PrometheusとAlertmanagerでSolrの異常を通知する

はじめに

前回の記事では Prometheus と Grafana による可視化を採り上げました。今回はさらに Alertmanager を組み合わせてメール通知を試してみました。

前回の続きで Solr と Prometheus と prometheus-exporter が動いている前提です。

Alertmanager のインストールと起動

$ wget https://github.com/prometheus/alertmanager/releases/download/v0.21.0/alertmanager-0.21.0.linux-amd64.tar.gz
$ tar zxf alertmanager-0.21.0.linux-amd64.tar.gz
$ cd alertmanager-0.21.0.linux-amd64
$ ./alertmanager --config.file=alertmanager.yml

今回はメール通知の動作確認用の alertmanager.yml を作成しました。メール以外にも Slack や Pushover など、様々な通知手段が用意されています。

global:
  resolve_timeout: 5m
  smtp_from: 'solr-alert@example.com'
  smtp_smarthost: 'localhost:25'

route:
  receiver: 'mail_test'

receivers:
- name: 'mail_test'
  email_configs:
    - to: 'alert-receiver@example.com'
      require_tls: false

Prometheus の設定

prometheus.yml でルールファイルを設定

rule_files:
  - "alert_rules.yml"

alert_rules.yml の内容

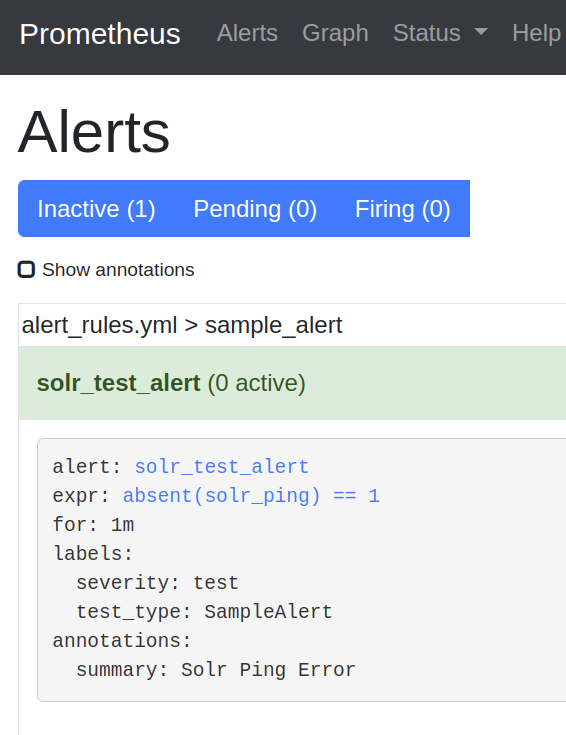
Solr の Ping API が正常応答しなかったら通知する設定です。

groups:
- name: sample_alert
  rules:
  - alert: solr_test_alert
    expr: absent(solr_ping) == 1
    for: 1m
    labels:
      severity: test
      test_type: SampleAlert
    annotations:
      summary: 'Solr Ping Error'

試してみる

正常な状態では、Prometheus の Alerts のページは以下のような表示です。

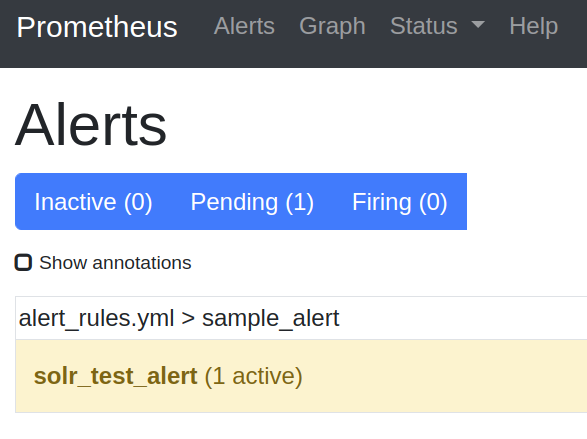
ここで Solr のプロセスを落としてみます。しばらく待つと異常を検知してPending状態に入ります。

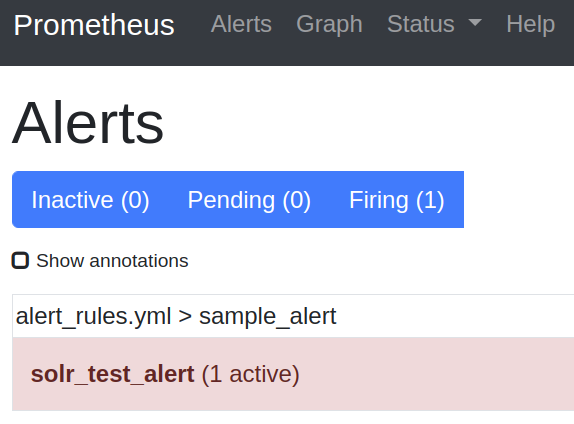
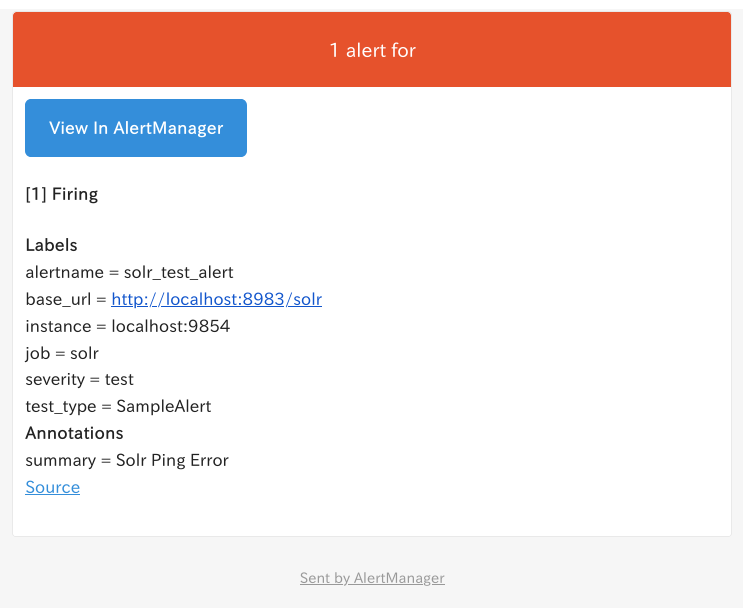
このまま回復しなければメール通知されます。

受信したメールの内容です。

おわりに

簡単な例でメール通知できるところまで設定してみました。

Prometheus と Alertmanager の組み合わせでは、promQL による条件の記述や振り分けルールの設定などを使ってかなり複雑なこともできるようになっており、Solr 自体の監視だけでなく、インデックスの内容に基づいたアラートも可能です。


Solrのprometheus-exporterにメトリクスを追加する

はじめに

prometheus-exporter に付属の設定ファイル(contrib/prometheus-exporter/conf/solr-exporter-config.xml)には様々なメトリクスの設定例が記載されており、これとGrafanaを組み合わせれば、かなり便利なダッシュボードが作れます。

この記事では、デフォルトの設定に無いメトリクスを自分で追加する場合の設定方法を試してみました。

solr-exporter-config.xmlの内容

SolrのどのAPIを使うかに応じて4つのセクションが用意されています。

  • <ping> PingRequestHandler へのリクエストを利用します
  • <metrics> Metrics APIを利用します
  • <collections> Collections APIを利用します
  • <search> 検索リクエストを利用します

たとえば <ping> セクションは以下のように定義されています。

    <ping>
      <lst name="request">
        <lst name="query">
          <str name="path">/admin/ping/</str>
        </lst>
        <arr name="jsonQueries">
          <str>                                                                                                         
            . as $object | $object |                                                                                    
            (if $object.status == "OK" then 1.0 else 0.0 end) as $value |                                               
            {                                                                                                           
              name         : "solr_ping",                                                                               
              type         : "GAUGE",                                                                                   
              help         : "See following URL: https://lucene.apache.org/solr/guide/ping.html",                       
              label_names  : [],                                                                                        
              label_values : [],                                                                                        
              value        : $value                                                                                     
            }                                                                                                           
          </str>
        </arr>
      </lst>
    </ping>

name=”path” でリクエスト先のパスを指定しています。

ping リクエストの応答をどのように加工するのかを指定しているのが、name=”jsonQueries” の下の str タグに囲まれた領域です。jq クエリが使われているので jq コマンドで動作確認できます。

$ curl --user solr:SolrRocks -s 'http://localhost:8983/solr/test_shard1_replica_n1/admin/ping/' |jq '            . as $object | $object |
>             (if $object.status == "OK" then 1.0 else 0.0 end) as $value |
>             {
>               name         : "solr_ping",
>               type         : "GAUGE",
>               help         : "See following URL: https://lucene.apache.org/solr/guide/ping.html",
>               label_names  : [],
>               label_values : [],
>               value        : $value
>             }
> '
{
  "name": "solr_ping",
  "type": "GAUGE",
  "help": "See following URL: https://lucene.apache.org/solr/guide/ping.html",
  "label_names": [],
  "label_values": [],
  "value": 1
}

searchメトリクスを追加してみる

単純な例ですが、全件検索(‘*:*’による検索)のヒット件数をグラフにしてみます。

solr-exporter-config2.xml に以下を追加します。

    <search>
      <lst name="request">
        <lst name="query">
          <str name="collection">wikipedia</str>
          <str name="path">/select</str>
          <lst name="params">
            <str name="q">*:*</str>
            <str name="start">0</str>
            <str name="rows">0</str>
          </lst>
        </lst>
        <arr name="jsonQueries">
          <str>
            .response.numFound as $value |
            {
              name         : "solr_num_wikipedia_entry",
              type         : "GAUGE",
              help         : "number of wikipedia entry",
              label_names  : [],
              label_values : [],
              value        : $value
            }
          </str>
        </arr>
      </lst>
    </search>

ここで指定した内容は、実際には以下のような検索リクエストになります。

$ curl --user solr:SolrRocks -s 'http://localhost:8983/solr/wikipedia/select?q=*:*&start=0&rows=0'
{
  "responseHeader":{
    "zkConnected":true,
    "status":0,
    "QTime":0,
    "params":{
      "q":"*:*",
      "start":"0",
      "rows":"0"}},
  "response":{"numFound":2264810,"start":0,"numFoundExact":true,"docs":[]
  }}

jq クエリによる加工結果は以下の通りです。

$ curl --user solr:SolrRocks -s 'http://localhost:8983/solr/wikipedia/select?q=*:*&start=0&rows=0' |jq '.response.numFound as $value |
>             {
>               name         : "solr_num_wikipedia_entry",
>               type         : "GAUGE",
>               help         : "number of wikipedia entry",
>               label_names  : [],
>               label_values : [],
>               value        : $value
>             }
> '
{
  "name": "solr_num_wikipedia_entry",
  "type": "GAUGE",
  "help": "number of wikipedia entry",
  "label_names": [],
  "label_values": [],
  "value": 2264810
}

prometheus-exporter によって以下のような Prometheus フォーマットに変換されます。

$ curl -s http://localhost:9854/|grep solr_num_wikipedia_entry
# HELP solr_num_wikipedia_entry number of wikipedia entry
# TYPE solr_num_wikipedia_entry gauge
solr_num_wikipedia_entry{zk_host="localhost:9983",} 2264810.0

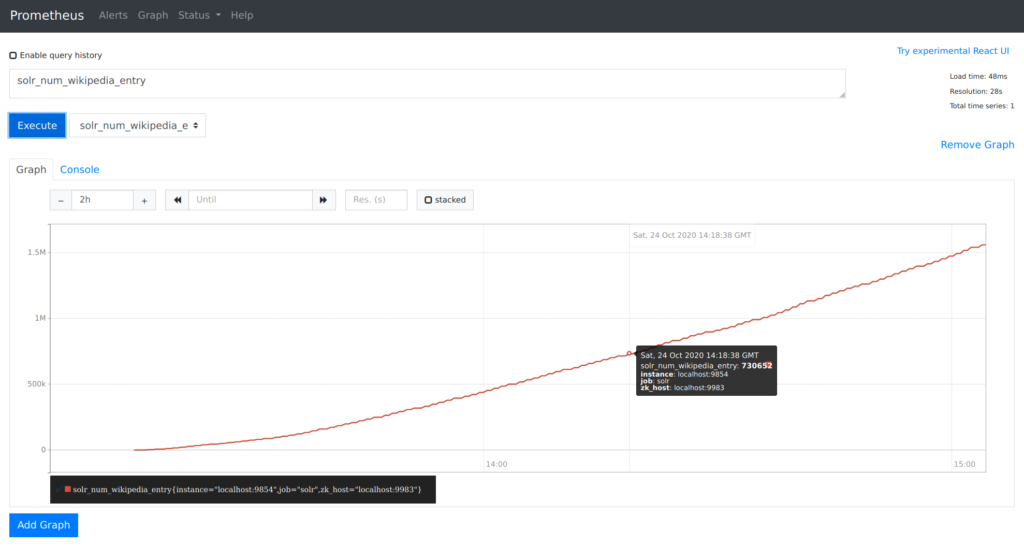
ここまで来れば、グラフ化するのは簡単です。下の画像は、データインポートハンドラでWikipediaの日本語全記事を投入したときの、記事数の変化をグラフ化したものです。


PrometheusとGrafanaでSolrの状態を可視化する

はじめに

Solr のリファレンスを見ると、Solr のモニタリングのために様々な手段が用意されていることがわかります。今回はその中で、Prometheus と Grafana を使った Solr ステータスの可視化を試してみました。

Prometheus のインストールと起動

ダウンロード

$ wget https://github.com/prometheus/prometheus/releases/download/v2.21.0/prometheus-2.21.0.linux-amd64.tar.gz
$ tar zxf prometheus-2.21.0.linux-amd64.tar.gz
$ cd prometheus-2.21.0.linux-amd64

設定

prometheus.yml に以下を追加

scrape_configs:
  - job_name: 'solr'
    static_configs:
      - targets: ['localhost:9854']

起動

./prometheus --config.file=prometheus.yml

prometheus-exporter の起動

prometheus-exporter は Solr と Prometheus との間に入って Solr のモニタリングデータをやり取りするためのプログラムです。ここでは Solr はすでに稼働中である前提です。

$ cd contrib/prometheus-exporter
$ ./bin/solr-exporter -p 9854 -b http://localhost:8983/solr -f ./conf/solr-exporter-config.xml -n 8

リファレンスではスタンドアロンモードの場合の起動方法と SolrCloud モードの場合の起動方法が紹介されていて、上記はスタンドアローンの場合です。SolrCloud でも内蔵の ZooKeeper を使っている場合はスタンドアローンの場合の起動方法を使わないとうまくいきませんでした。

prometheus 上での動作確認

http://localhost:9090/ にアクセスして
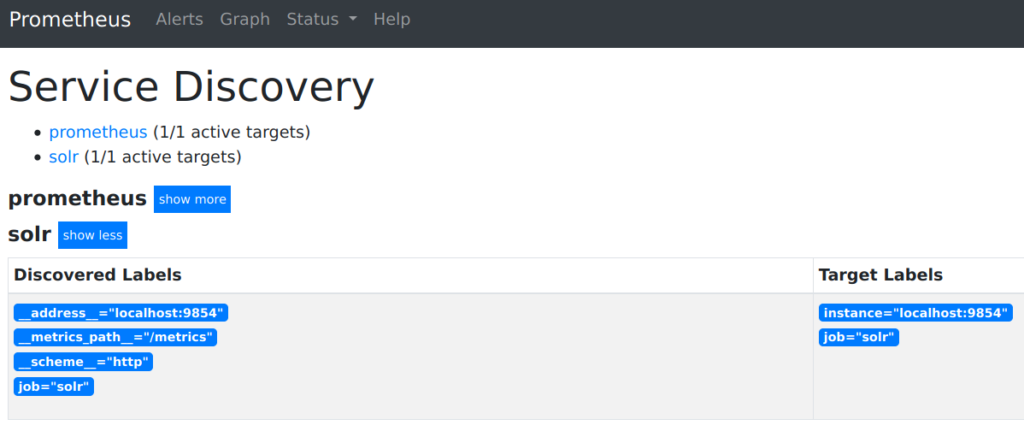
Status → Service Discovery で solr がリストに含まれていればOK。

Grafana のインストールと起動

$ wget https://dl.grafana.com/oss/release/grafana-7.2.0.linux-amd64.tar.gz
$ cd grafana-7.2.0
$ bin/grafana-server web

Grafana でダッシュボード作成

  1. http://localhost:3000/ にアクセスして admin:admin でログイン
  2. Data Source を追加
    1. Configuration → Data Sources
    2. Add data source で Prometheus を選択
    3. Settings のタブで URL に http://localhost:9090/ を入力して Save & Test を実行
  3. ダッシュボードの設定をインポート
    1. Dashboards → Manage で Manage 画面を開いて Import ボタンを押す
    2. Upload JSON file ボタンを押して contrib/prometheus-exporter/conf/grafana-solr-dashboard.json をアップロード
    3. Options 画面でダッシュボード名と Data Source を指定してインポート

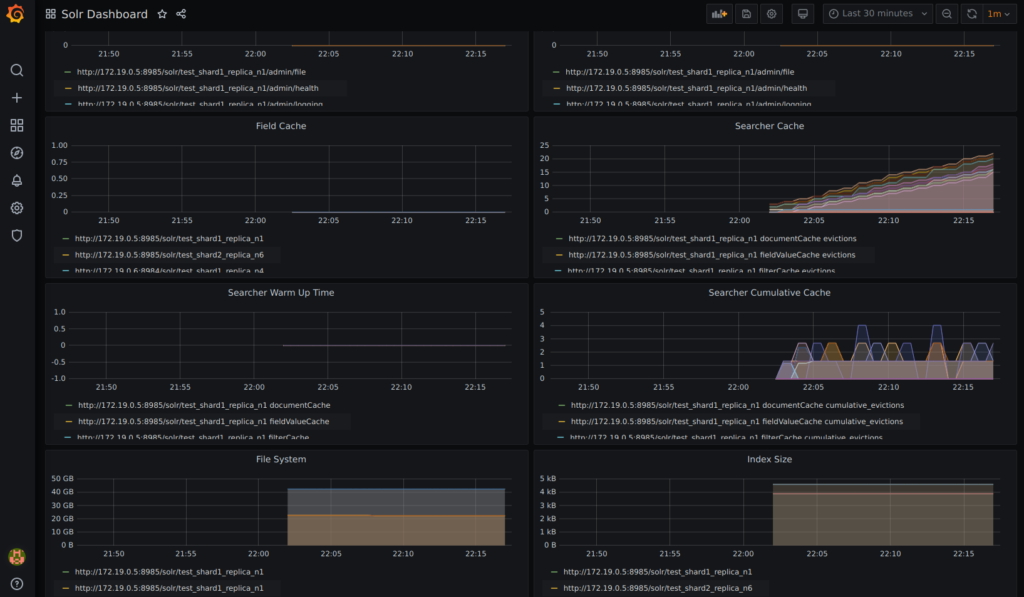
うまくいけば以下のようなダッシュボードに各種のグラフが表示されるようになります。


Solrのパッケージ管理機能がクラスタレベルのプラグインに対応しました

はじめに

以前の記事で紹介したパッケージ管理機能ではコレクションレベルのプラグインを管理できました。Solr 8.6 でクラスタレベルのプラグインにも対応しました。クラスタレベルのプラグインとは、クラスタを構成するノード毎に1個だけインスタンスを作るプラグインです。

リファレンスの説明だけでは分かりにくいところもあったので、使い方をまとめてみました。

リポジトリ登録まで

リポジトリを作成して Solr に登録 → インストール →デプロイという流れは同じなので、リポジトリ作成の詳細は前回の記事を参照してください。

プラグインのコード

プラグインが提供する API のエンドポイントに関する情報をアノテーションで記述するところがミソです。path の指定の中で $path-prefix という変数が参照されていますが、これは後述のリポジトリ定義(repository.json)で定義されます。

リポジトリ定義

クラスタレベルをサポートするにあたって type フィールドが追加されたようです。指定しない場合は collection になるので、クラスタレベルの場合は type: cluster を指定しなければうまくデプロイできません。

コレクションレベルのときと大きく異なるのは setup-command と uninstall-command です。それぞれ、以下の API リクエストに対応しています。

curl -X POST -H 'Content-type:application/json' --data-binary '
{
  "add": {
  "name":"myplugin",
  "class": "myplugin:jp.co.splout.solr.plugins.MyPlugin",
  "path-prefix" : "splout",
  "version": "1.0.0"
  }
}' http://localhost:8983/api/cluster/plugin

curl -X POST -H 'Content-type:application/json' --data-binary '
{
  "remove": "myplugin"
}' http://localhost:8983/api/cluster/plugin

verify-command をどう定義すべきかよく分からなかったので省略してありますが、これでも動くようです。

リポジトリ登録

$ bin/solr package add-repo MyPlugin http://localhost/solr/repo1
$ bin/solr package list-available 
Available packages:
-----
myplugin 		Cluster Level Plugin Example
	Version: 1.0.0
	Version: 1.1.0

インストール

-cluster オプションを指定します。

$ bin/solr package install myplugin:1.0.0 -cluster
Posting manifest...
Posting artifacts...
Executing Package API to register this package...
Response: {"responseHeader":{
    "status":0,
    "QTime":56}}
myplugin installed.
$ bin/solr package install myplugin:1.1.0 -cluster
Posting manifest...
Posting artifacts...
Executing Package API to register this package...
Response: {"responseHeader":{
    "status":0,
    "QTime":5}}
myplugin installed.

$ bin/solr package list-installed
Installed packages:
-----
{
  "name":"myplugin",
  "version":"1.0.0"}
{
  "name":"myplugin",
  "version":"1.1.0"}

デプロイ

ここでも -cluster オプションを指定します。

$ bin/solr package deploy myplugin:1.0.0 -cluster
Executing {"add":{"name":"myplugin","class":"myplugin:jp.co.splout.solr.plugins.MyPlugin","path-prefix":"splout","version":"1.0.0"}} for path:/api/cluster/plugin
Execute this command. (If you choose no, you can manually deploy/undeploy this plugin later) (y/n): 
y
1 cluster level plugins setup.
Deployed on [] and verified package: myplugin, version: 1.0.0
Deployment successful

clusterprops.json

クラスタレベルでデプロイされたプラグインの情報は、ZooKeeper に置かれた clusterprops.json から読み出せます。

$ curl http://localhost:8983/api/cluster/zk/data/clusterprops.json
{"plugin":{"myplugin":{
      "name":"myplugin",
      "class":"myplugin:jp.co.splout.solr.plugins.MyPlugin",
      "version":"1.0.0",
      "path-prefix":"splout"}}}

プラグインのAPI呼び出し

ソースコードでエンドポイントのパスを “/$path-prefix/myplugin” と定義しました。repository.json で path-prefix を “splout” と定義したので、このプラグインの API は以下のように呼び出せます。

$ curl http://localhost:8983/api/splout/myplugin
{
  "responseHeader":{
    "status":0,
    "QTime":0},
  "myplugin.version":"1.0.0"}

アップデート

–update -cluster オプションを指定して deploy を実行します。

$ bin/solr package deploy myplugin:1.1.0 --update -cluster
Updating this plugin: org.apache.solr.client.solrj.request.beans.PluginMeta@aa370c48
Posting {"update": {
  "name":"myplugin",
  "class":"myplugin:jp.co.splout.solr.plugins.MyPlugin",
  "version":"1.1.0",
  "path-prefix":"splout"}} to /api/cluster/plugin
1 cluster level plugins updated.
Deployed on [] and verified package: myplugin, version: 1.1.0
Deployment successful

動作確認します。

$ curl http://localhost:8983/api/splout/myplugin
{
  "responseHeader":{
    "status":0,
    "QTime":0},
  "myplugin.version":"1.1.0"}